This guide will walk you through the entire setup – from creating a service account to configuring the necessary APIs and OAuth credentials.
By completing these steps, you’ll enable CyberPilot to securely sync user and group data from your Google Workspace environment and allow users to log in to the CyberPilot platform using their Google accounts.
Let’s get started 👇
Prerequisites
Before you get started with this guide, make sure you have:
-
Super Admin access to Google Admin Console (admin.google.com)
-
Owner or Editor access to Google Cloud Console (console.cloud.google.com)
-
Admin access to your CyberPilot account
-
Your CyberPilot subdomain (find it under Settings > Account > General)
Part 1: Notify your Customer Success Manager
The first step is telling your Customer Success Manager that you would like to set up Google AD and SSO. Your Customer Success Manager will give your account a subdomain, and then you'll be able to continue with the setup process.
Part 2: Generate Google Config
To integrate Google Workspace with CyberPilot, you'll need to create a service account in Google Cloud Console. This enables CyberPilot to securely manage users and groups via API.
1. Create a project in Google Cloud Console
-
Click the project dropdown and select "New Project"
-
Name it (e.g., CyberPilot) and click Create

2. Enable Admin SDK API
-
In your new project, go to APIs & Services > Library
-
Search for Admin SDK
-
Click it, then click Enable


3. Create a Service Account
-
Navigate to IAM & Admin > Service Accounts
-
Click Create Service Account
-
Name it, then click Create and Continue
-
Grant the role: Service Account Token Creator
-
Click Done


4. Generate a Private Key
-
Click on the service account you just created
-
Go to the Keys tab
-
Click Add Key > Create New Key
-
Choose JSON format
This will download a .json file containing:
client_idclient_emailprivate_key

5. Delegate Domain-Wide Authority
-
Under the service account settings, go to the Details tab
-
Click "Show Domain-Wide Delegation" and enable it
-
Note the Client ID – you’ll need it in the next step
6. Authorize API Access in Google Admin Console
-
Go to: https://admin.google.com (requires super admin)
-
Navigate to: Security > Access and data control > API Controls > Domain-wide Delegation


-
Click "Add new"

-
Enter the Client ID from your service account
-
Add the following scopes:
-
https://www.googleapis.com/auth/admin.directory.user.readonly -
https://www.googleapis.com/auth/admin.directory.group.readonly -
https://www.googleapis.com/auth/admin.directory.group.member.readonly
-
-
Click Save
7. Add Credentials to CyberPilot
Use the .json file you downloaded in Step 4.
Note:
If you are uploading the JSON file directly in CyberPilot, no changes are needed.
If you are copy-pasting the private key value manually, remove all line break characters and replace them with actual line breaks before pasting.
Part 3: Set Up and Manage Google Groups
You need to define which users will be synced to CyberPilot.
This is done through Google Groups. CyberPilot uses these groups to automatically identify and manage which users should be added or removed from your CyberPilot account.
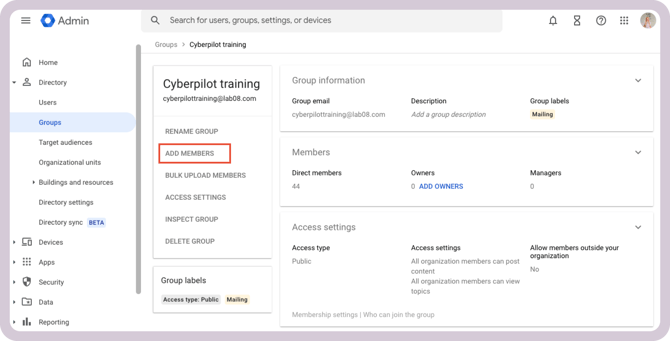
1. Create or Select a Google Group
-
Go to your Google Admin Console
-
Navigate to Directory > Groups

-
Click Create Group
-
Enter a clear and descriptive name. For example:
-
Click Create

Tip: Each Google Group represents a set of users you want CyberPilot to sync.
You can have multiple groups if you want to manage access levels separately (for example, users in groups or branches).
2. Add Members to the Group
-
Open the group you just created
-
Click Add Members
-
Enter the email addresses of the users you want to include
-
Assign each as Member, Manager, or Owner
CyberPilot automatically syncs members of the group.
Managers and owners are included only if they are also listed as members.
You can update group membership at any time, and CyberPilot will automatically reflect those changes during the next sync.
3. Fetch the Group ID
Each Google Group has a unique Group ID that CyberPilot uses to identify which group(s) should be synced.
You’ll need to copy this ID and add it to your CyberPilot configuration.
Follow these steps:
-
Go to the Google Admin Console
-
Open Directory > Groups
-
Find and select the group you want to use
-
Look at the URL in your browser – the Group ID is included there
Example URL:
https://admin.google.com/ac/groups/1234567890abcdef/details
In this example, the Group ID is:
1234567890abcdefYou’ll need to repeat this process for each group you plan to sync with CyberPilot. Copy and paste each Group ID into the CyberPilot integration settings during setup.
Part 4: Add the Group in CyberPilot
Once you have your Group Object ID, you can configure the mapping inside CyberPilot.
-
Log in to your CyberPilot account
-
Go to Settings > Account
-
Click the Integrations tab
-
Select Google integration
-
Under Google Config, select User Management
-
Upload Private key JSON file to import the configuration you did in Part 2.
-
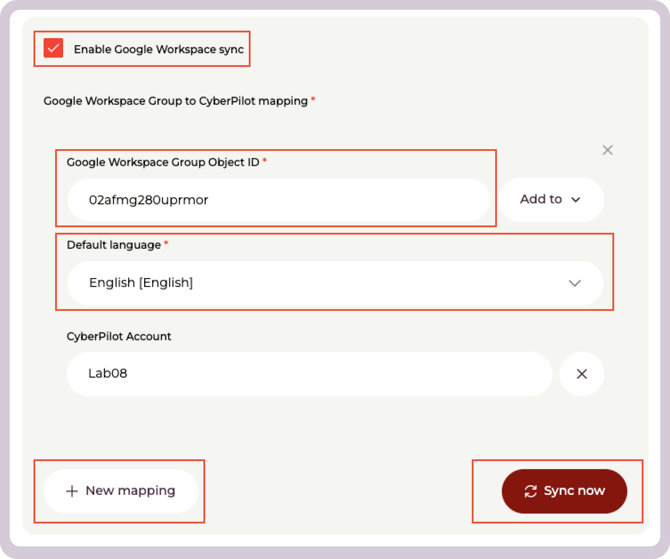
Check Enable Google Workspace sync
-
Fill in the following fields:
-
Google Workspace Group Object ID – paste the ID you copied from the Google Admin Console
-
Select Add to to allow specific mappings to CyberPilot objects
-
Default language – select the language new users should have
-
-
Under Google Workspace Group to CyberPilot mapping, click + New mapping if you want to setup additional group mappings to branches or CyberPilot groups
-
Click Sync now to start the synchronization immediately
-
CyberPilot syncs Google Groups automatically once per day. To sync immediately, click Sync now in the Google integration settings.
-
After syncing, all users in the specified Google Group will automatically appear in your CyberPilot user list. Removing a user from the group will remove their access in CyberPilot during the next sync.
Part 5: Configure Google as SSO
This section enables users to log in to CyberPilot using their Google accounts via SSO.
Important: Part 5 requires a new, separate set of credentials — an OAuth 2.0 Client ID and Client Secret.
Do not use the JSON private key file downloaded in Part 2. These are two different credential types for two different purposes:
-
Part 2 credentials (Service Account JSON) → used for syncing users from Google Groups
-
Part 5 credentials (OAuth 2.0 Client ID + Client Secret) → used for SSO login
1. Open Google Cloud Console Credentials
-
Select the same project you created earlier
2. Configure OAuth Consent Screen
- In the left sidebare, go to APIs & Services
- Select OAuth consent screen

- Under user type, select Internal
- Click create
- Fill in the required fields:
- App name: eg. CyberPilot
- User support email: select your admin email adress from the dropdown
- Scroll down to Developer contact information and enter your email adress
- Click save and continue
- On the Scopes page, click save and continue - no scopes needed to be added here
- Click Back to dashboard to finish
3. Enable Required APIs
The Admin SDK API enabled in Part 2 is sufficient. No additional APIs need to be enabled for SSO.
4. Create OAuth 2.0 Credentials
-
Go to APIs & Services > Credentials
-
Click + Create Credentials > OAuth 2.0 Client ID
-
Select Web application
-
Give it a name (e.g., CyberPilot SSO)
The Client Secret shown here is your SSO secret. It is not the same as the private key from Part 2. Store both the Client ID and Client Secret — you will need them in the next step.
5. Set Redirect URIs
-
Under Authorized redirect URIs, add the URI your app will handle after login. It's important you replace *subdomain* in the URI to the subdomain set in the CyberPilot App. You'll find it under Account → General
Example format:https://login.app.cyberpilot.io/realms/*subdomain*/broker/google-sso/endpoint
-
Click Save
-
Copy the Client ID and Client Secret from the confirmation dialog

- In CyberPilot, go to Settings > Account > Integrations > Google

- Under the SSO section, paste your Client ID and Client Secret
- Click Save
Still have a question?
Contact us at support@cyberpilot.io