With this setup, users in selected Microsoft Entra groups are:
-
Automatically added to the CyberPilot platform
-
Able to log in via SSO using their Microsoft credentials
-
Removed from CyberPilot when they are removed from the synced Entra group (except Admins)
✅ You only need to go through this process once. After that, your user access will stay up to date automatically.
The steps are:
- Create Entra ID Group(s) for CyberPilot
- Verify required user properties
- Create a CyberPilot enterprise application
- Configure API permissions
- Create client secret
- Configure AD Sync in CyberPilot
- Configure SSO in Microsoft Entra ID
- Configure SSO in CyberPilot
Before you get started, see these prerequisites:
#1: Using Company Name in your dynamic rule
Prerequisite
(only if you plan to use companyName in your dynamic rule)
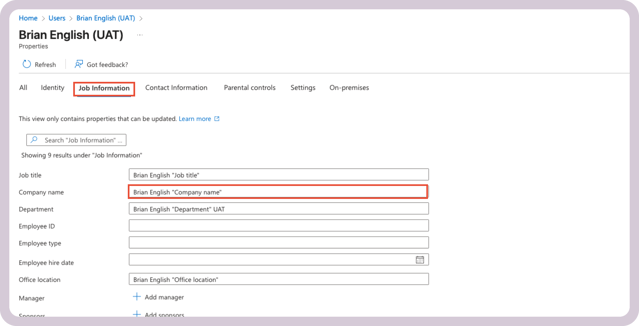
If you intend to use companyName in the dynamic membership query, populate Company Name for all targeted users first; otherwise, the group won’t resolve members and the sync will fail.
Option A: Managed directly in Entra ID
-
Sign in to the Microsoft Entra admin center.
-
Go to Entra ID → Users → All users → select a user.
-
Click Edit properties → Job information.
-
Fill Company name and Save.
Option B: If you sync from on-prem AD
-
Open Active Directory Users and Computers.
-
Open the user → Organization tab.
-
Fill Company → OK and let Azure AD Connect sync.
(This maps to Entra’scompanyName.)
#2: If you use an on-premises Active Directory
Requirement if you use an on-premises Active Directory
To integrate on-premises Active Directory (AD) with Microsoft Entra ID, you must install and configure Microsoft Entra Connect.
This tool synchronizes your local identity information (users, groups, etc.) with Entra ID and thereby makes it possible to sync your users to the CyberPilot platform.
Step 1: Create Entra ID Group(s) for CyberPilot
We recommend creating dedicated groups for CyberPilot training. This makes it easier to control who gets access.
-
Click Groups > New group

-
Set:
-
Group type: Security
-
Name: e.g., CyberPilot Awareness
-
Membership type: Dynamic User (or Assigned if preferred)

-
-
Add a dynamic query (recommended safe default)
Use a rule that doesn’t rely on
companyNameunless you’ve completed the prerequisite above. For example:user.userType -eq "Member" -and user.accountEnabled -eq true
You can refine further with department or jobTitle if those fields are consistently populated.If you really want to use
companyName:Make sure every targeted user has the Company Name field filled (see Prerequisite above) before creating the rule - otherwise, the group won’t populate.

-
Save the group

-
After creating the group, note down the Group Object ID — you’ll need it later.

-
Confirm your email is a member of the group

Step 2: Verify required user properties
CyberPilot syncs the following properties from Microsoft Entra ID:
-
Required:
User Principal Name,First Name,Last Name,Email -
Optional (recommended for better reporting):
Company Name,Department,Manager,Country,Job Title,Mobile Phone,Office Location,Preferred Language
⚠️ If you plan to use a dynamic rule that filters on companyName, make sure Company Name is populated for all targeted users (see Prerequisite above).
If Preferred Language is set, it determines the user’s default language in CyberPilot. Users can override this manually.

Step 3: Create a CyberPilot enterprise application
-
Go to Enterprise Applications in Entra admin center
-
Click + New application > Create your own application


-
Choose Non-gallery application and give it a name

-
After creation:
-
Click Assign users and groups

-
Add the Entra group you created earlier

-
Step 4: Configure API permissions
-
Go to App registrations > [Your CyberPilot App]

-
Click API permissions > Add a permission > Microsoft Graph

-
Select:
-
Application permissions
-
Group.Read.All -
User.Read.All
-
-
Click Add permissions, then Grant admin consent

Step 5: Create client secret
-
Go to your CyberPilot App in App registrations
-
Click Certificates & secrets > New client secret
-
Set a description and expiration (24 months recommended)

-
Click Add
-
Copy and save:
-
Client Secret Value (you’ll only see this once)
-
Client Secret ID
-
Application (Client) ID
-
Directory (Tenant) ID
-


Step 6: Configure AD Sync in CyberPilot
-
Log in to your CyberPilot subdomain:
https://yourcompany.app.cyberpilot.io - If you use CyberPilot though itm8, your domain will be:
https://yourcompany.awareness.itm8.com -
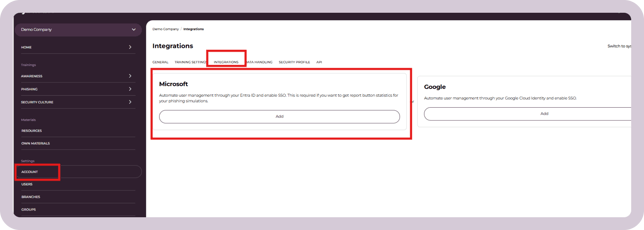
Go to Settings > Account > Integrations > Microsoft
-
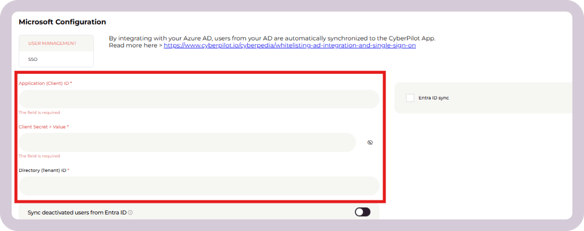
Enter:
-
Client ID
-
Client Secret
-
Tenant ID
-
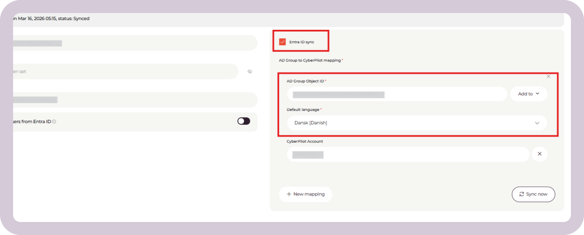
- Enable the Entra ID Sync toggle
- Add a new mapping:
-
Enter the Group Object ID
-
Choose where users are mapped (account or branch)
-
(Optional) Set default language for users in this group
-
- Click save
- Use "Sync now" to test that it works

Field Mapping
Beta: Advanced field mapping is currently in beta. If you do not see it on the platform, it's because the setting is not turned on for your account yet. If you would like to try it out, contact your Customer Success Manager
When you enable the Entra ID sync, CyberPilot automatically pulls user information from Entra ID and maps it to the corresponding fields in CyberPilot. Fields that are synced this way are locked — they can't be edited manually in CyberPilot as long as sync is active for that field.
You can customize the mapping under Settings > Account > Integrations > Microsoft > Sync settings. From there, you can turn off sync for individual fields (which makes them editable again in CyberPilot), or map a custom Entra attribute by entering it manually.

⚠️ Custom field names are not validated. If an incorrect name is entered, the sync will fail silently — so double-check any custom field names before saving.
Note that user activation/deactivation and group or branch assignment are not part of field mapping - these are controlled via separate toggles in the same settings area.
Step 7: Configure SSO in Microsoft Entra ID
-
Go to Enterprise applications > [Your CyberPilot App]
-
Select Single Sign-On > SAML


-
In Basic SAML Configuration, edit:
-
Replace "your-subdomain" in the URLs below with the subdomain you'll find in the CyberPilot App under "Account" - "General"
Identifier:https://login.app.cyberpilot.io/realms/your-subdomain
Reply URL:https://login.app.cyberpilot.io/realms/your-subdomain/broker/saml/endpoint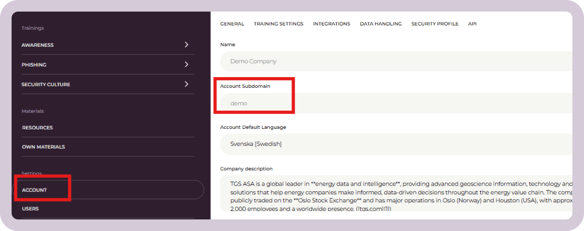
- If you use CyberPilot though itm8, use these configurations instead:
Identifier URL:
https://login.awareness.itm8.com/realms/***
Reply URL:https://login.awareness.itm8.com/realms/***/broker/saml/endpoint
-
-
Save the settings
-
Copy the App Federation Metadata URL and save for the next step

Step 8: Configure SSO in CyberPilot
-
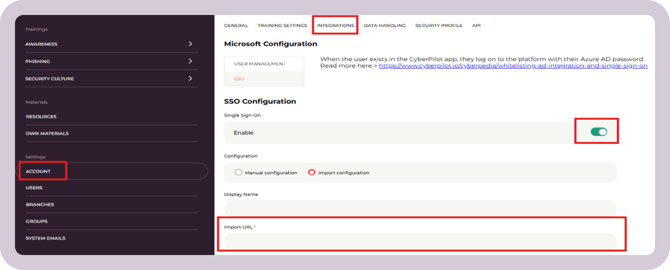
Go to Settings > Account > Integrations > Microsoft > SSO
-
Enable Single Sign-On
-
Select Import configuration
-
Paste the App Federation Metadata URL
-
Click Save
-
Test login at your subdomain using SSO
Step 9: Let us know you're done
Please notify your CyberPilot customer success manager once setup is complete so we can finalize onboarding.