As an admin, you can add, edit, deactivate, and archive users and admins.
If you only need to make one or two small edits to a user, we recommend doing it manually. You can read this article for guidance on how to create and edit users.
Keep in mind that if you have set up an AD integration, all the users that are handled by the AD must be managed in your AD, and any changes to these users will be ignored when uploading a spreadsheet.
How to add/update many users at the same time by uploading an .xlsx file
You can manage the users in your overall account, a specific group, or a branch by importing/exporting .xlsx files. Just use the correct menu item to get started: "Users" "Branches" or "Groups".
Start by downloading your current user list
Step 1: Choose how to get your file
Before uploading users, you need a file to work with.
If you already have users
Use this when you want to update existing users.
-
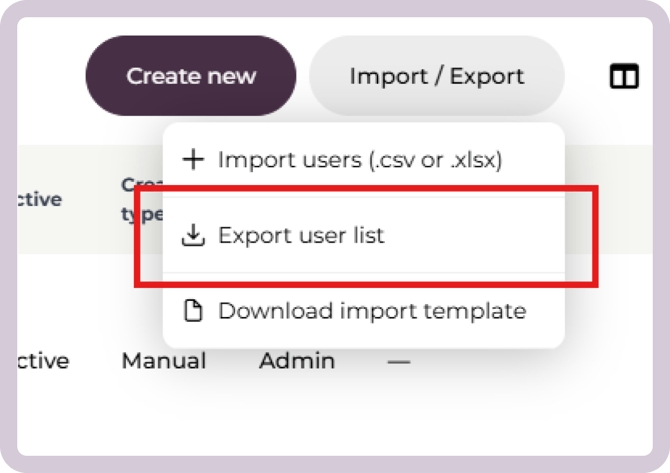
Go to Users
- Click Import/Export
-
Click Export user list
-
Download the file
You can now edit this file and upload it again.
If you are creating users for the first time
Use this when your account has no users yet, or you want a clean starting point.
-
Go to Users
-
Click Download import template
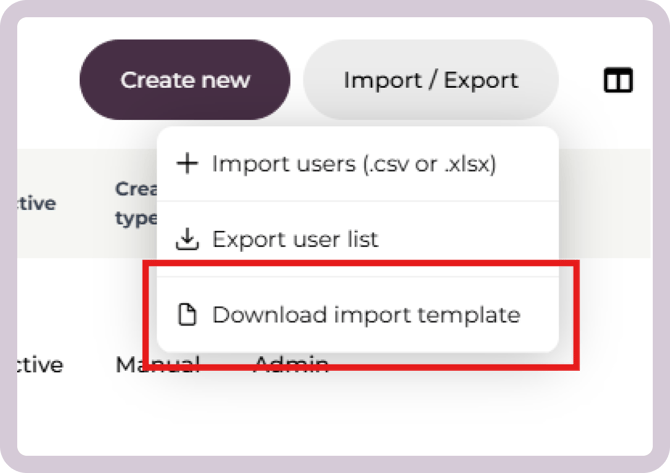
This gives you a simple file that you can fill in with your user data.
Step 2: Edit your file
Open the file and update it based on what you want to do.
-
Update existing users by editing their information
-
Add new users by adding new rows
-
Deactivate users if needed
-
Remove the rows with users you want to delete
You only need to update the information you want to change. Required columns are marked with a *.
Step 3: Choose how to assign users and upload your file
You can decide how users should be placed in your organization when uploading your file.
Option 1: Upload to a specific group or branch
-
Go to Groups or Branches
-
Upload your file there
Users will be added directly to that group or branch.
Option 2: Assign users through your file
-
Upload your file under Users
-
Include the group or branch information in your file
Users will be created and assigned based on the information in the file.
Which option should you use?
-
Use Option 1 if you are working with one specific group or branch
-
Use Option 2 if you are managing multiple groups or branches in one file
Upload your file
-
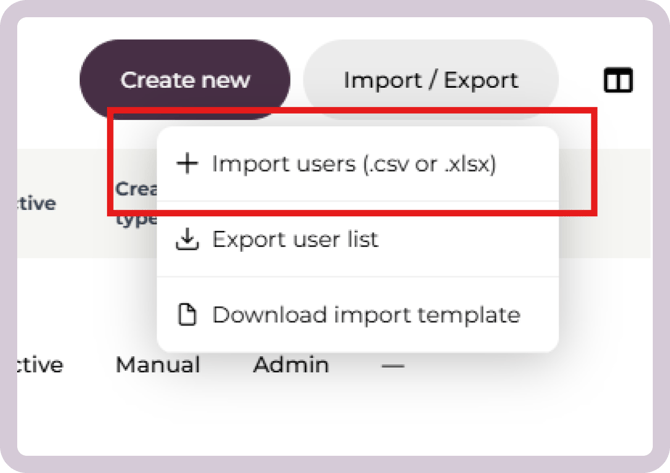
Go to the relevant section (Users, Groups, or Branches)
-
Click Import/export
-
Click Import users
-
Select your file
-
Upload
Before the import is completed, you'll see a confirmation screen showing a summary of the changes - how many users will be created, updated, or removed.
If your account has an active phishing product, the summary will also show how many users in the file have email domains that are not verified. These users will still be created, but they won't receive phishing simulations. You can verify domains under Settings → Account → Emails & Delivery.
Users will be created or updated based on the file.
Tip: If you’re unsure, upload under Users and manage assignments in the file.
Still have a question?
Contact us at support@cyberpilot.io