| Use cases | Groups | Branches |
| Tag users for training and reports | ✅ | ✅ |
| Filter reports by segments | ✅ | ✅ |
| Control admin access to data | ❌ | ✅ |
| Match organization structure | ❌ | ✅ |
| Each user can belong to: | Multiple groups | One branch only |
Use Groups if:
-
You only need to segment users for targeted training and reporting.
-
You don’t need to restrict admin access to user data.
-
You want to compare performance across roles (e.g., warehouse vs. desk workers).
Use Branches if:
-
You need to limit admin access to specific users or data.
-
You want to mirror your organizational structure (e.g., departments, locations).
-
You have sub-companies or units requiring independent administration.
In this article, we show you what groups and branches do, and how they work when you manually manage your users (you aren’t using AD-integration to sync your users).
If you use AD-integration
You can still use branches and groups. You can map groups in your Microsoft Entra ID (formerly Azure AD) or Google AD to any group, branch, or your overall CyberPilot account.
Learn how to set it up in our AD-integration guide.
Jump right to the Groups part of the article
Jump right to Branches part of the article
Groups
A group is a way to segment users for your training. This allows you to send different phishing emails and trainings out to different types of employees. You can also see how different user groups perform on the training by filtering your reports.
We’ll show you how to do all that later.
We recommend you use groups to segment users by their job roles.
For example, you might want to see how your warehouse workers are doing on their training compared to your desk workers. They could also have a different training curriculum, because warehouse workers use IT differently than your desk workers.
If you only have one admin in your account, or you aren’t worried about limiting the visibility admins have into the training of all users, it’s best to segment your users by groups.
How to create a group
- Click on Groups from the left menu
- Click on Create new
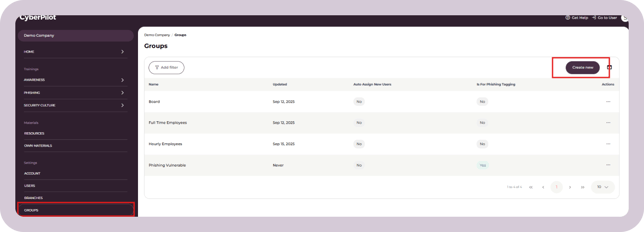
- Name the group
- If you want all new users created to automatically be assigned to this group, enable the toggle called Auto assign new users
- If you don’t want this, keep the toggle switched off
- Click Create
Your group has been created.
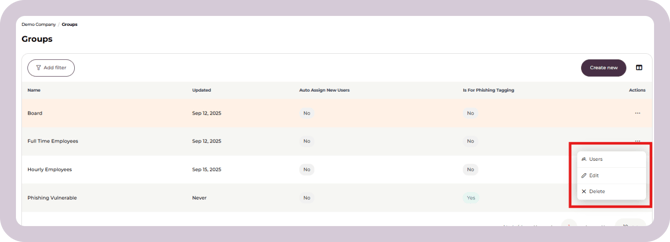
How to edit a group
- Click on Groups from the left menu
- Click on the “...” associated with the group you want to edit
- Here, you can delete the group or edit the group (name, whether new users are automatically put into the group, and the users in the group)
What if you delete a group?
When you delete a group, all the users are removed from the group. They are basically unassigned from the group. The users are not deleted though, they will still exist under your account. If the users were in a branch, they will remain in that branch.
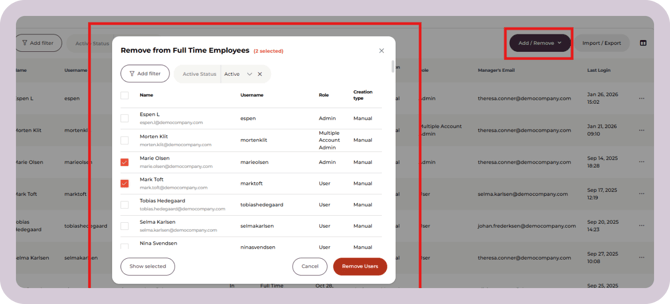
How to add/remove users from a group
You can manage the users in a group by following the steps to edit the group (above).
Click on Users to see the users in the group. Here, you can add users to the group by searching for their name or email address, or remove users from the group by clicking the “...” next to their name and selecting Remove.
Other group functions
You can use groups to customize the training and reporting experience. We have some articles where you can read about that:
- Enrolling training to groups
- Filtering reports by groups
- Sending phishing campaigns to groups
- What an admin in a group can do
- User management – adding users to groups
Branches
Branches allow you to limit the users and data an admin in your organization has access to. Like groups, branches are another way to segment your users for training enrollments, phishing simulations, and reporting.
A main reason to use a branch instead of a group is if you need to limit the user data or phishing results an admin in your organization has access to
If you have more than one admin in your account and you don’t want all the admins to have access to the entire organization's training, it’s best to use branches to segment your users.
If this is the case, you should create branches and place admins within those branches. An admin in a branch will only be able to manage the users, training, and reports for the users within their branch and any sub-branches.
For instance, an admin in a branch can see all phishing campaigns in the account, but they can only see phishing results for the users in their branch and any sub-branch to this branch.
We recommend you use branches to represent your organization's structure
You can use branches to segment your users in a way that mirrors the structure in your organization. For example, you can create branches that represent different units in your company, sub-companies, departments, or locations.
Each branch can have sub-branches
To further categorize your users, you can make sub-branches and sub-sub branches. For example, imagine a company with 2 office locations. They might create a branch for each office location. And within those branches, create sub-branches for different departments. It could look like this:
Branch 1: Office Location X
- Sub-branch: Accounting Team
- Sub-branch: Marketing Team
- Sub-branch: Sales Team
Branch 2: Office Location Y
- Sub-branch: Accounting Team
- Sub-branch: Marketing Team
- Sub-branch: Sales Team
and so on.
Each user can only belong to one branch
To keep a clear hierarchy and structure to your users, the CyberPilot App only permits a user to belong to one branch. If you believe a user should belong in different branches, place them in the branch that best reflects their primary department.
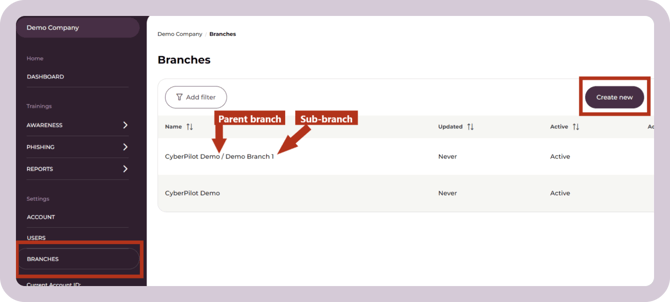
See the branches in your account
The branch function is not automatically populated or filled out. If an admin in your organization does not create branches, your users will not be placed in any branches based on, e.g., your AD integration.
To view any existing branches: Click on Branches in the navigation pane
Now you can see the list of your current branches and sub-branches:
You have to actively add users to branches
You will have to actively add your users to the branch once it has been created. You can do this when you create new users manually or indicate a branch when uploading users.
How to create a branch or sub-branch
If you want to create a sub-branch, you should first create the parent branch.
To create a branch:
- Create new button in the right corner
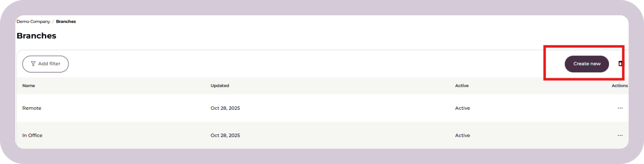
- Fill in the branch name
- Select the Parent Branch if you're creating a sub-branch
- Slide the toggle to set the branch as active
- Click Create
The branch will now appear on your branches overview page.
How to edit a branch
To make changes to an existing branch, click on the "..." under Actions corresponding to the appropriate branch. This gives you quick actions to:
- View and edit the users in the branch
- Edit the branch (name, parent branch)
- Deactivate the branch
- Delete the branch
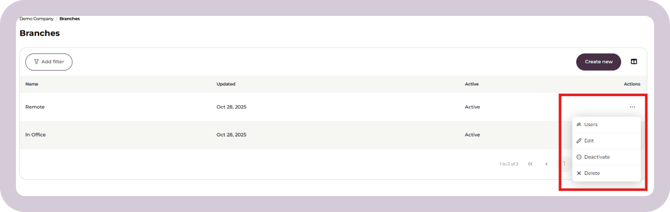
Click into these options to complete your desired action.
What if you delete a branch?
Please note: When you delete a branch, all sub-branches to the branch, and their users, will also be deleted. ALL users in the branch and sub-branches are also deleted. The users will no longer exist in your account..
How to add and remove users from a branch
If you use AD-Integration to sync your users the the CyberPilot App, you can sync users to specific branches automatically.
In this article, we walk you through the process for mapping users to branches in the CyberPilot App through your Entra ID.
The next sections will cover doing this manually – if your users login with a username and password.
Add users to a branch
Open the branch you want to add users to and go to Users.
Users can be added to branches in several ways:
-
Add existing users to a branch
-
Create users manually and assign them to a branch
-
Map users automatically through your ID integration
-
Create or update users through CSV/XLSX import
Add existing users to a branch
If the users already exist in the account, the easiest way to add them to a branch is usually to:
-
Export the existing user list
-
Update the Branch column for the relevant users
-
Upload the file again
This allows multiple users to be assigned or moved between branches at the same time.
You can also add existing users directly from the branch:
-
Open the branch
-
Go to Users
-
Search for the users you want to add to the branch
-
Click Add users
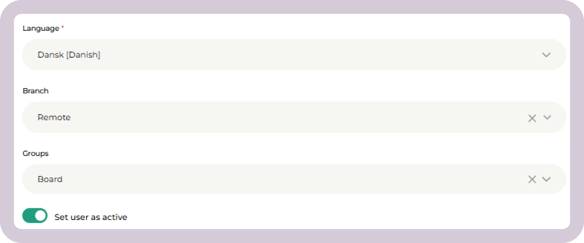
Create users manually and assign them to a branch
When creating the user manually, select the branch you want the user to belong to.
Map users to branches through your ID integration
If your account uses Microsoft Entra ID / AD sync, users can automatically be mapped to branches through the integration configuration.
This is typically done through field mapping or group-based mapping in the integration setup.
Create or update users through import
CSV/XLSX import can be used to:
-
Create new users
-
Update existing users
-
Deactivate users
-
Bulk remove users no longer included in the uploaded file
Follow the steps below to import users.
1. Download the user list or template
-
For first-time uploads and new accounts: Go to Users → Import / Export → Download template
- If you already have users in the platform: Go to Import / Export → Export user list
2. Edit the file
Fill in the spreadsheet with the users and/or changes to existing users you want to import. When you import the spreadsheet, the system will match users based on their username.
Examples:
-
Add new users by creating new rows
-
Update existing users by editing their information
-
Deactivate users by changing Active from
YestoNo -
Add users to groups or branches
-
Schedule reactivation using the Reactivation date field
Only fill out the fields you want to update.
If you do not want to update a specific user, remove them from the file before uploading.
3. Upload the file
You do not need to upload users separately per branch.
To upload the file:
-
Open Users
-
Click Import / Export
-
Select Import users (.csv or .xlsx)
-
Upload the file
Before the import is completed, CyberPilot will analyze the file and show:
-
How many users will be created
-
How many users will be updated
-
How many users will be marked for deletion
You can choose whether you want to:
-
Create users
-
Update users
-
Remove users not included in the uploaded file
If removal is enabled, users missing from the uploaded file will be marked for deletion according to the account’s normal user deletion logic.
For accounts using Microsoft Entra ID / AD sync:
-
AD-managed users are not removed through CSV/XLSX upload
Fields
Columns marked with * in the template are required.
All other fields are optional.
If a branch or group does not exist, it will automatically be created when importing users via a CSV or XLSX file. This does not apply to Microsoft Entra ID or Google AD group mappings — when setting up a mapping, the CyberPilot group or branch must already exist. Create it first if needed.
Remove users from a branch
You can remove users from a branch in the Users page or the Branches page.
On the Branches page - helpful if you need to remove several users from the same branch
- Click on the branch the user is in
- Click on Users
- Find the user you want to remove
- Click on the "..." associated with the user
- Click Remove
- Confirm that you want to remove the user from the branch
On the Users page - helpful if you need to reassign a user to a different branch
- Start by clicking on Users in the navigation pane
- Find the user whose branch status you want to change and click to open their details
- Scroll to the bottom and find Branch
- To remove the user from all branches, click on the X next to the branch name
- To change the branch the user is in, click on the V next to the branch name and select the new branch from the menu
- Click Save
Other branch functions
- Enrolling training to branches
- Filtering reports by branches
- Sending phishing campaigns to branches
- What an admin in a branch can do
- User management – adding users to branches
Still have a question?
Contact us at support@cyberpilot.io